A great number of users are confused about the Unified Write Filter feature, but most of them don’t know how to use it on Windows 10. In this post, MiniTool explains its definition and provides an installation and use guide of the UWF feature.
Unified Write Filter (UWF) is a practical file system write filter that’s used to protect your system and user files on the local drive from any changes. It can protect your selected drive by redirecting and intercepting any writes to the drive (settings changes, saved data, and app installation) to a virtual overlay.
This UWF Windows feature brings many benefits for users:
Of course, this feature also has some limitations. It is an optional Windows 10 feature that can only be used on Windows 10 Enterprise, Windows 10 IoT Enterprise, and Windows 10 IoT Core. In addition, it’s not fully supported except for the FAT and NTFS file systems. For example, you cannot create file exclusions on an exFAT volume. To know more features of the UWF Windows feature, you can click here.
What is UWF? Now, I believe that you have already known the answer. Let’s see how to install and use it on Windows 10.
Since Unified Write Filter is an optional feature, you need to install it before you use it. The most common way is to install UWF on a customized Windows image. To do so, follow the steps below.
Step 1. Type cmd in the search box, and then right-click the Command Prompt from the top result and select Run as administrator. Click on Yes in the UAC window to grant the admin right for Command Prompt.
Step 2. Press Win + E keys to open the File Explorer, and then copy and paste the install.wim file to a temporary folder on your hard drive, and rename it to C:wim.
Step 3. Create a new directory: md c:wim.
Step 4. In the elevated Command Prompt window, type the following command and hit Enter to mount the image.
dism /mount-wim /wimfile:c:bootmediasourcesinstall.wim /index:1 /MountDir:c:wim
Step 5. Then you can continue to enable Unified Write Filter using CMD or using the following method we will explain. To do so, run the following commands in order.
Step 6. To activate UWF, you can run the following commands. (Here we take the C drive for example)
Before you enable and use the UWF feature on Windows, we want you to know some changes that UWF will make to your system. For that:
How to turn on Unified Write Filter? Now, follow the steps below to enable it.
Step 1. Click Start, type Turn Windows features in the Search box and select Turn Windows features on or off from the top result.
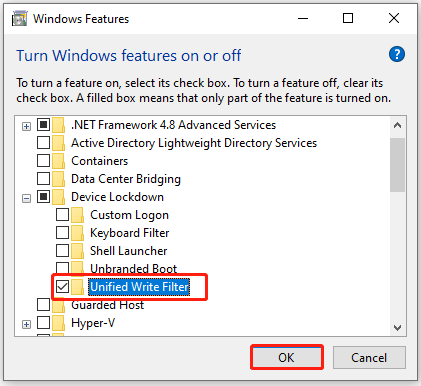
Step 2. In the Windows Features window, expand the Device Lockdown category and tick the checkbox next to Unified Write Filter.
Tip: You can turn off the feature by unchecking the Unified Write Filter box in the same location, Alternatively, you can run uwfmgr filter disable in the elevated Command Prompt window and restart your computer to execute the change.
Step 3. Click on OK to save the change and close the window.
Once you enable the feature on Windows, you can use it to protect your drive or do other something based on your needs.
Step 1. Open the elevated Command Prompt window just like Step 1 in the UWF installation part.
Step 2. Copy and paste the following command in the CMD window and hit Enter to enable write protection for the drive. Here you can replace the C: with the drive you want to protect.
uwfmgr.exe volume protect C:
Step 3. Restart your computer and everything you write to the disk during the session will be available only till the next startup.
Step 4. You can check if the UWF is enabled for your drive by running the command below:
uwfmgr.exe get-config
Further reading: If you want to see the current overlay settings where UWF stores temporary data, run this command: uwfmgr overlay get-config. If you want to use Disk overlay, run this command: uwfmgr overlay set-type Disk.
Ariel has been working as a highly professional computer-relevant technology editor at MiniTool for many years. She has a strong passion for researching all knowledge related to the computer's disk, partition, and Windows OS. Up till now, she has finished thousands of articles covering a broad range of topics and helped lots of users fix various problems. She focuses on the fields of disk management, OS backup, and PDF editing and provides her readers with insightful and informative content.